Wednesday, July 27, 2011

EcoTech Marine VorTech MP10w ES

After having to downgrade my return pump, I knew I needed more flow in the tank. I looked at tons of different pumps and wavemakers for hours. I won't go into why each product failed to fit what I wanted. Instead, I'll just say that I am so glad I bought the VorTech. It's quiet (when adjusted to a reasonable power) and doesn't click when spinning up. Tons of flow. Since the motor is outside of the tank, almost no heat is transferred to the water. The controller has many programs and features like feeding mode, night mode, and coordinating wirelessly with multiple units. First I built a wave using short pulses that match the resonance of the tank. This wave is used in nutrient transport mode to sweep up detritus and then move it to the overflow. After that I tried out reef crest mode. I think that's what I'll be using for now. It'll be a while, but I'm very anxious to see what mode and configuration works the best for the coral.
Day 6

Permanent Aquascaping


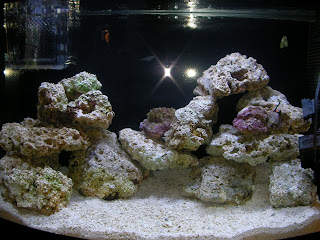
After getting a feel for the live rock, I wanted to make a permanent setting to prevent rocks from falling over. Some of the popular methods include epoxy, using cable ties, making a pvc frame, and using plastic rods drilled into connecting rocks. I went with the connecting rods using plastic coat hangers and Waterweld epoxy. The process was time consuming, but I think it ended up looking pretty good. I can shake any of the rocks pretty hard and they won't budge. The two small rocks covered in purple didn't like the process and bleached almost completely. This should be my last time destroying the tank like this so hopefully I can get the coralline algae to come back strong.
Day 5

Thursday, July 21, 2011

Live Rock

 Today I received 45lbs of Fiji Standard Live Rock from Fosters and Smith Aquatics. It cost $80 + $60shipping, ending up about $3/lb. Much cheaper than the $12.50+tax that the local fish store was charging. Expecting lower quality, I could then add nicer smaller pieces that I hand pick later. The rock itself is very pretty, but has very little coralline algae and color. There's many articles about making PVC foundations and using cable ties and epoxy to set the rocks permanently, but I've decided to save this task for after playing around with the arrangements a while.


While making as many caves as possible, I need much more creativity to be able to make it look natural. I'd like to have an arch in the top middle. Now the live rock cures and my biological filtration (bacteria) grows to cycle the tank. I will be monitoring ammonia and nitrite levels every couple of days and performing 15% (5gal) water changes every week. Hopefully the cycling process won't take more than about 6 weeks.

Day 1
Day 3

Return Pumps

The job of the return pump is to pump water from the water reservoir under the tank (sump/trickle filter) into the aquarium. The pump included with my filter kit is the Sicce Syncra Silent 2.0 rated at 568gph or 5.9ft head. It definitely did its job being quiet, but just didn't provide the flow I was expecting. I knew I wasn't going to get the 500gph because of the 4ft of head. Basically, the pump has to not only provide the flow I need, but also lift the water from the sump on the floor to the top of the tank. So I did a little research into "flow". The most common unit of aquarium flow is the number of times the volume of your tank is cycled per hour. So 10x would mean 36gal * 10times/hour = 360gph. Most basic aquariums are good with 5x. From what I found on the forums, a good reef aquarium needs 20x flow, meaning 720gph in my tank. [[Lesson learned: let me clarify that 20x is the total flow in the display tank. Really you only want at least 10x on your return pump.]] I loved how silent my first pump was so I went to the Sicce website and found a great flow vs head graph.
After taking into account the two 90degree bends and the 1" tubing, I figured 5ft head. The Syncra 4.0 at 951gph(0head) or 12.5ft(0flow) came the closest to the flow I was needing. After ordering it online, I decided to experiment and siphon 5gal of water into a bucket and have it pump it all back into the tank. I fully realize this is not a perfectly accurate way to rate the flow of my working aquarium, but it was definitely the easiest. It took 32seconds which calculated to 560gph. Way short of the 720gph that the forums recommended, but still good flow. I then set it up in the tank and loved the way the debris on the bottom got picked up while leaving the sand in place. The problem: it was way too loud for my living room. I took care of the gurgling and will explain that in my next post. I left it for a whole day only hearing the (loud) low hum of the pump. Finally, I decided it just wasn't working for me. If in the future I need more flow, I will add a wavemaker setup. After having a Syncra 2.0 that was silent but fell short on flow and a Syncra 4.0 that had great flow but too loud, I set out for the local fish store to pick up a Syncra 3.0 at 714gph or 9.8ft head. Perfect! Good flow through the tank and very quiet. Thanks Cuda for buying my 4.0!  The protein skimmer is just starting to make good bubbles, but still has to wait before I'm getting any foam out of it. Tomorrow my live rock is being delivered; so excited!

Saturday, July 16, 2011

Lighting Canopy

Figuring out how I wanted to do the lighting turned out to be a huge headache. I had a 24" power compact fluroescent retrofit kit built into an old Eclipse 3 "all-in-one" hood. I had several options: place the light on the glass, hang the light from the wall or ceiling, build a full canopy for the tank, or figure out some box to put it in. I finally decided to make a wood box to sit on top of the glass. This would allow the light to be raised from the glass while not having it shining in the eyes of someone on the couch beside it. Using a jigsaw, I cut two 29"x6" and two 6"x5.5" pieces of 1/2" oak. After using 2" decking screws I had laying around, next wood working project I will use proper cabinet joints. After a light sanding, I stained with "Black Cherry" and satin polyurethane. Using a pvc spacer, I screwed the reflector/heat shield to the top-inside of the box. In the center I screwed in the ballast and a 8cm computer fan. I attached the fan to a universal AC-DC power adapter. I've found that 4.5V pushed plenty of air while remaining silent. If I ever run into problems with too much heat, I can easily switch to 6V or more. Power plugs for the adapter and the ballast were then plugged into a dual outlet digital timer switch. I replaced the old 6700K light with a 50/50 10,000k natural daylight and true actinic 03 blue 65W compact fluorescent bulb. In the near future, I hope to add LED moonlighting. I ended up with a great looking lighting canopy that can be easily moved to the floor when cleaning and has plenty of room for an additional compact fluorescent or LED light strip.

Friday, July 15, 2011

Initial Equipment

Here's the beginning of the chronicle of my new fish tank. This is my first venture into saltwater, so I've got plenty to learn. Let's start out with my initial equipment.

Tank Aqueon 36 Gallon Bow Aquarium and Glass Hood 
Stand Aqueon Bow Front Aquarium Stand
Filter Aquarium Life Support Systems P1000 Pkg #2
Return Pump Syncra 3.0 Aquarium pump 714 gph 9.9 ft head
Skimmer Aquarium Life Support Systems 22V Protein Skimmer
Skimmer Pump Syncra 1.5 Aquarium pump 357 gph 6 ft head
Lighting 65W Power Compact Fluorescent 50/50 Straight Pin
Substrate CaribSea Seaflor Special Grade Reef Sand 60lbs
Heater 200W Heater
Salt
Refractometer
Premixed Water $1/gal
Live Rock Drs. Foster & Smith Standard Fiji Live Rock 45lbs 
Test Kits